by Richard Taylor
Introduction
PlayBack allows you to record mouse movements, mouse button clicks and keystrokes and then replay them. These recordings can then be used for demonstration or educational purposes, providing a novel method for introducing desktop applications to all levels of users. Recordings may be up to 1 hour long and can have an associated commentary to describe the recorded actions as they occur.
PlayBack will run on all Acorn RISC OS systems with 1Mb of RAM.
Installing PlayBack
You are recommended to make a backup copy of PlayBack, either on hard disc or on floppy disc, and to keep the original disc in a safe place. Use the backup copy for your day-to-day use of PlayBack. If the backup should be lost or corrupted you may then use the original to make a fresh backup.
Your purchase of PlayBack entitles you to make one copy of the software for your own use. If you wish to use several copies you must purchase a site licence from ProAction. It is illegal to supply copies of PlayBack to a third party.
Please note that PlayBack uses the font SwissB for the commentary display if the font is available in your !Fonts directory. A !Fonts directory containing SwissB is supplied with PlayBack; if you use a hard disc and do not have a !Fonts directory, copy this over on to your hard disc. If you already have a !Fonts directory, just copy the SwissB directory from within the !Fonts directory on the floppy disc supplied into the !Fonts directory on your hard disc. If you do not have a hard disc, use the !Fonts directory as supplied or copy the SwissB directory from within !Fonts on the floppy disc supplied into your existing !Fonts directory.
Loading PlayBack
To load PlayBack double-click on its icon; when it has loaded its icon will appear on the icon bar. Only one copy of PlayBack may be loaded at once.
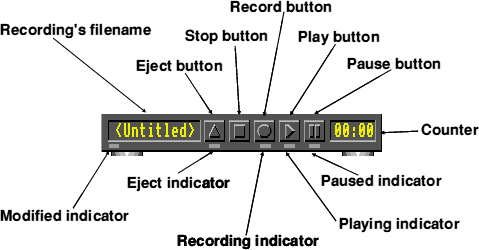
Click Select on the icon to display PlayBack's windows. The main window contains the control panel shown below and the second window is the commentary window:
Making a recording
It is very important when preparing to make a recording of a desktop operation that you take time to plan what it is that you want to achieve with the recording. Without planning, recordings can be made that run too quickly or that have long pauses; this is especially true if a commentary is added, since time must be allocated during the recording to allow the user to read the commentary.
To start a recording click Select on the Record button or press Alt F7; the Recording indicator will turn red to show that recording is taking place and the counter will start. Any movement of the mouse, mouse clicks or keyboard strokes will now be recorded. You can pause the recording by clicking on the Pause button or by pressing Alt F9; the Paused indicator will turn orange to show that the recording is paused. To start recording again click on the Pause button or press Alt F9 once more. To stop the recording click on the Stop button or press Alt F6; the Recording indicator will turn grey. Notice that the Modified indicator has turned yellow: this shows that the recording has been altered and not saved. The Eject indicator icon has turned blue showing that there is now a recording that can be ejected.
Ejecting a recording
If you wish to remove the recording you have made, click on the Eject button or pressing Alt F5 and the mouse movements, mouse clicks and keystrokes will be removed from the recording. You can now start a new recording.
Playing back a recording
To play back a recording click on the Play button or press Alt F8; the Playing indicator will turn green to show that a recording is being played back. The recording can be paused or stopped whilst being played back by pressing Alt F9 or Alt F6 respectively. Whilst playing back, mouse clicks will be represented by a clicking sound.
Extending a recording
The current recording can be extended either from the end of a tape or from a paused position.
To extend a recording click on the Record button or press Alt F7. The pointer will be repositioned to where it was when the recording was stopped. The recording will be extended from this point.
To extend a recording from a paused position play the recording to the point just before where you want to start re-recording and press Alt F9 to pause the play back. Click on the Record button or press Alt F7 to extend the recording from that point. The pointer will be repositioned to where it was when the recording was paused.
This feature allows you to create complex recordings in stages. This is very useful since you only need to plan and record the stages in turn.
Saving a recording
A recording can be saved using the Save option on the PlayBack window's menu. Choosing this option will open a save dialogue box. Drag the PlayBack file icon to a directory display to save the file. The file name will be displayed on the control panel.
Loading a saved recording
A saved recording can be loaded by dragging its icon to the PlayBack window or icon, or by double-clicking on the file. A dialogue box will be displayed giving information about the recording. To remove it click Select anywhere outside of dialogue box.
Quitting PlayBack
To quit PlayBack choose the Quit option on the icon bar menu. You will be warned if a recording has been modified and not saved.
Adding a commentary
A commentary can be added to a recording to explain the actions that are taking place. The commentary can be added at any stage during the creation of a recording, but it is recommended that you decide on the commentary first and then make the recording. This may seem the wrong way around, but you will find that if you make a recording first you will leave insufficient time during mouse or keyboard operations for the user to read the commentary on the operation.
A commentary can be created in any text editor that outputs plain ASCII text, such as Edit. Each comment must be three lines long; each line being terminated by a line feed and not being more than 78 characters in length. A line may contain nothing but a line feed if fewer than three lines of text are required. A typical portion of a commentary text file would look like this:
| line 1 | | Introducing Draw's toolbox |
| line 2 | | |
| line 3 | | |
| line 1 | | This is the toolbox. The tools available allow you to draw objects, |
| line 2 | | enter text and select objects. |
| line 3 | | |
| line 1 | | This tool allows you to create straight line segments. |
| line 2 | | |
| line 3 | | |
To load a commentary text file drag the file's icon into the commentary window. The icon to the left of the window will turn green to show a commentary is loaded.
To aid you in setting the correct time for commentary to appear a Next line option is provided on the commentary window menu. If you choose this option another line is added to the bottom of the commentary window. It will show the first line of the next set of three lines of commentary. To remove the additional line when playing back choose the option again from the commentary window menu.
Start your recording and press Alt F10 each time you want to display the next three lines of commentary text. This will set the commentary time. When playing back the recording the commentary will be displayed at this time. Read through the commentary yourself whilst still recording. This will allow a pause long enough for the user of the recording to read the commentary. The commentary will appear in the SwissB font supplied with the package unless this font is not in the current font directory. If the font is not available the text will appear in the system font.
If no text is available when Alt F10 is pressed then a number will appear in the commentary window. This number corresponds to the position of a set of three lines in the commentary text file. So when a text file is loaded, 1 will be replaced with the first set of three lines, 2 with the second set etc.
Commentary times can also be set in the same manner as described above whilst playing back a recording.
Adding a commentary modifies the recording. When you save the recording, as described above, the commentary text and times are also saved.
Extending a commentary
If you are creating a long recording you may wish to do this in stages as described above in 'Extending a recording'. If you require a commentary this may also be created in stages. To do this proceed as described above and create the first stage of the recording with an associated commentary. Before moving on to the second stage save the commentary file to disc using the Save option on the commentary window menu. Now load the commentary into a text editor, such as Edit, and add the commentary for the next stage. Save the amended file and load back into the commentary window. Now create the second stage of the recording and repeat this process until the recording is complete.
Resetting the commentary
Whilst creating a commentary it is possible that you will want to reset so that there is no commentary text or no commentary times. To clear the commentary text choose the Clear text option on the commentary window menu. This will discard the text, but leave the commentary times intact. Any new commentary text that is loaded will appear at these commentary times.
You must use the Clear text option before loading commentary text directly from a text editor if the Protection choice is on.
If you want to change the commentary times choose the Clear times option from the same menu. This will remove all of the commentary times, but will not affect the text. The commentary text will not appear until new commentary times are added. New times can then be added by playing back the recording and pressing Alt F10 at the appropriate times.
Resetting PlayBack
To reset PlayBack to the state before any recording was made, choose the Reset option on the PlayBack window menu. This is the equivalent of clicking on the Eject button and choosing the Clear text and Clear times options from the commentary window menu.
Suggested method for recording
To bring all of the above points together here is the suggested method for recording:
- Plan what you want to do before doing anything.
- Remember that you do not need to create the recording all at once. If the recording is complex do it in stages.
- If the recording is to have a commentary write this first and load it.
- Choose the Next line option so that you can see what commentary text is coming next.
- Make sure that the desktop is in a reproducible state and that the commentary window is visible. Use mode 12 or 20.
- Start recording.
- Enter text markers as required. Read through the text slowly yourself whilst still recording; this will give the user time to read the text when the recording is played back.
- Pause the recording at any time when you are not sure how you want to continue. This will give you time to think about what to do next or even look at the commentary text for inspiration.
- Perform mouse operations at a slower pace than normal so that they can be followed easily on playback.
- Play the recording at least twice to ensure it is correct.
Notes on creating recordings
It is very easy to create a recording that cannot be replayed because the original conditions that were present when the recording was made cannot be reproduced. Here is a list of things that need to be remembered when creating recordings:
- Very little can be taken for granted in the desktop. This is especially true of the position of windows. Generally the first window opened by RISC OS compliant software will always be in the same position and of the same size. Subsequent windows will be shifted relative to the original. If you intend to give a recording to someone else it may be best to insist that required windows are already opened or that the application is installed on the icon bar as the first operation after a reset (therefore clicking on the icon will open the application's first window).
- Although the desktop is supposed to be mode independent, differences between modes can lead to a recording going wrong. Make sure that the recording is done in a widely available mode (12 or 20) and that the user is in the same mode. You can do this by giving a warning in the commentary or description texts or by recording a change of mode at the beginning of your recording (you can assume that the palette icon is in the same place in most cases).
- If you enter data into a writable icon remember to type Ctrl U first. This will clear the contents of the writable icon and ensure that what you want entered is entered. This is especially important when using the Repeat option.
- If a recording has a commentary ensure that the commentary window can be seen.
Script file format
The recording can be saved as a script file. This converts it into a text file which can then be altered in a text editor, such as Edit, and converted back to a recording. This option is provided so that small mistakes in a recording can be rectified without re-recording. For example, you could alter a commentary time or remove accidental keypresses. To save a recording as a script use the Save script option on the PlayBack window menu. The script can be saved directly to an editor or to disc by dragging. Once the file has been edited it must be saved to disc. Dragging the file back from disc into the PlayBack window or on to the PlayBack icon will convert it back to a recording. If the file contains syntax errors the process of conversion will be halted and an error message displayed.
The script file is in two sections the first is ordered on time. Times for events are shown in this format:
MM:SS.CC
where MM = minutes, SS = seconds and CC = centiseconds.
Mouse position is shown by:
MM:SS.CC M XXXX YYYY
where M is the mouse position symbol and XXXX and YYYY are the X and Y coordinates (in OS Units) of the mouse pointer at the time shown.
A mouse click is shown by:
MM:SS.CC C XXXX YYYY V
where C is the mouse click symbol and V represents the value of the click. V can take these values:
| 4 | Select |
| 2 | Menu |
| 1 | Adjust |
| 0 | Any button release |
Commentary text is shown by:
MM:SS.CC T

Commentary line 1

Commentary line 2

Commentary line 3
where T is the text symbol followed by three lines of commentary text.
A keypress is shown by:
MM:SS.CC K AAA
where K is the keypress symbol and AAA is the ASCII value for that keypress.
If a commentary time is set without any commentary text being loaded it is represented by:
MM:SS.CC U
where U is the symbol an unused commentary time.
The first section of the script file ends with an E, as a symbol for the end of section. The second section contains spare commentary and the file description, if there is any.
Spare commentary text is shown by:
S

Commentary line 1

Commentary line 2

Commentary line 3
where S is the symbol for spare text and the following three lines are the spare text.
The description is shown by:
D

Description line 1

Description line 2
where D is the symbol for the description and the following two lines are the description text.
The script file is terminated with an F.
Miscellaneous options
Stopping a recording after an error
A recording can be halted once an error has occurred by pressing Esc. Whilst an error box is displayed the keypress Alt F6 will not work.
File info
Choosing this option displays this dialogue box:
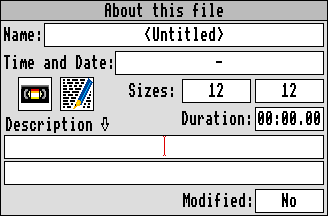
This gives information about the recording including a two line description which may be entered at the caret by the user. This dialogue box is displayed when the tape is loaded. To dispose of the dialogue box click anywhere outside of it.
Repeat
Choosing this option on the PlayBack window menu allows recordings to be played continuously. It is important that the conditions that exist at the beginning are reinstated by the end of the recording. When using this option you should always play a recording through twice to ensure that this is the case.
Choices
Choosing this option will open the dialogue box shown below:
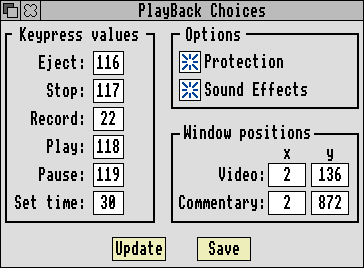
The Keypress values show which keys in conjunction with the Alt key will control the given operations. The number shown is the internal key number for the key. Change these values if they clash with an application you are using. A list of internal key numbers is given at the end of this guide.
The Protection option which is selected by default will give warning messages when the Eject button is clicked on, when the Clear text and Clear times options are selected or when a commentary text file is loaded. If the option is off these warnings will not be given.
The Sound effects option which is selected by default will cause mouse clicks to be represented by a clicking sound.
The Window position option values set the x and y coordinates (OS Units) of the two PlayBack windows. The windows will be at the positions given by these coordinates when they are first opened.
Clicking on the Update button will update the application to the values set in the choices dialogue box, but will not save these values.
Clicking on the Save button will save the values as the default choices. The application will use these values every time it is loaded.
PlayOnly
The PlayOnly application allows recordings created using PlayBack to be played. This application is Public Domain and as such can be supplied with recordings you have created to users who have not purchased the PlayBack application. The !Fonts directory and its contents must not be provided with any recordings and PlayOnly. ProAction cannot accept any liability for damage, such as loss of data, caused by recordings supplied with this application. The operation of PlayOnly is exactly the same as that of PlayBack except that no changes can be made to the recording.
The example recordings
The four example recordings supplied with PlayBack can be used by you to learn how the application works and to provide a basis for your own recordings. There follows a brief description of how your machine should be set up for each of them to work correctly; all of them require the desktop to be in mode 12 or 20:
PlayBack
This recording goes through the icons used in the application. It assumes that the window positions are the default window positions for the application and that the PlayBack icon is the next to the Palette icon. To ensure that this is so quit the application and reload it. Load the recording and click on the Play button or press Alt F8.
Palette
This recording shows how the desktop palette operates.
Drawtools
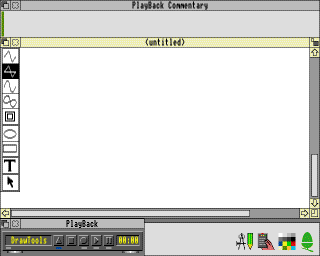
This recording describes the toolbox in Draw. It assumes that Draw has been loaded and a window opened. Your screen should look like that shown below before you play back the recording. Please note the position of the vertical scroll bar on the Draw window:
| Click the image to open a full-size version in a new browser window |
|
 |
Edittext
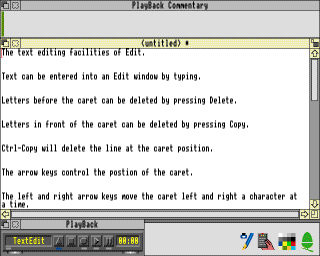
This recording describes the editing facilities of Edit. It assumes that you have Edit loaded and a window open containing some text. The text used should be the commentary text for this file. To load the text into Edit use the Save option on the commentary window menu. Drag the icon either on to Edit's icon or into an empty Edit window. The screen should look like that shown below before you play back the recording:
| Click the image to open a full-size version in a new browser window |
|
 |
The example recordings will play even if your machine is not set up correctly. If you notice that the commentary does not tie in with the recording go through the set-up once more. This is most likely to occur if you have not positioned the windows correctly or if you have other windows open.
Internal key numbers
| Key | | Internal key number |
| Print (F0) | | 32 |
| F1 | | 113 |
| F2 | | 114 |
| F3 | | 115 |
| F4 | | 20 |
| F5 | | 116 |
| F6 | | 117 |
| F7 | | 22 |
| F8 | | 118 |
| F9 | | 119 |
| F10 | | 30 |
| F11 | | 28 |
| F12 | | 29 |
| A | | 65 |
| B | | 100 |
| C | | 82 |
| D | | 50 |
| E | | 34 |
| F | | 67 |
| G | | 83 |
| H | | 84 |
| I | | 37 |
| J | | 69 |
| K | | 70 |
| L | | 86 |
| M | | 101 |
| N | | 85 |
| O | | 54 |
| P | | 55 |
| Q | | 16 |
| R | | 51 |
| S | | 81 |
| T | | 35 |
| U | | 53 |
| V | | 99 |
| W | | 33 |
| X | | 66 |
| Y | | 68 |
| Z | | 97 |
| 0 | | 39 |
| 1 | | 48 |
| 2 | | 49 |
| 3 | | 17 |
| 4 | | 18 |
| 5 | | 19 |
| 6 | | 52 |
| 7 | | 36 |
| 8 | | 21 |
| 9 | | 38 |
| , | | 102 |
| - | | 23 |
| . | | 103 |
| / | | 104 |
| [ | | 56 |
| \ | | 120 |
| ] | | 88 |
| ; | | 87 |
| Tab | | 96 |
| ` | | 45 |
| £ | | 46 |
| Insert | | 61 |
| Home | | 62 |
| Page Up | | 63 |
| Page Down | | 78 |
| ' | | 79 |
| Space Bar | | 98 |
| Delete | | 89 |
| Return | | 73 |
| Copy | | 105 |
| Up arrow | | 57 |
| Right arrow | | 121 |
| Left arrow | | 25 |
| Down arrow | | 41 |
Default keypresses
| Alt F5 | | Eject |
| Alt F6 | | Stop |
| Alt F7 | | Record |
| Alt F8 | | Play |
| Alt F9 | | Pause |
| Alt F10 | | Set commentary marker |
| Esc | | Stop after error |
Copyright © ProAction, 1998
All rights reserved
No part of this product may be reproduced in whole or part by any means without written permission of the publisher. Unauthorised hiring, renting, lending, public performance or broadcasting of this product or its parts is prohibited.
ProAction supply PlayBack under licence for use on one computer at a time. The user may make one copy of the disc for backup purposes only. Please write or 'phone for details of multi-user licences.
While every care is taken, the publisher cannot be held responsible for any errors in this product, or for the loss of any data or consequential effects from the use of this package.
If you discover a problem with this product, please write to ProAction at the address below explaining the problem as briefly as possible, but including all relevant information, e.g. system configuration, hardware add-ons, version of operating system. Please do not return your disc or packaging until requested to do so. Always remember to quote the version number of the application.
PlayBack was written by Richard Taylor.
Sprite graphics by Stephen Mead.
FIRST EDITION 1998
PlayBack is published by ProAction Software
Enquiries via R-Comp, 22 Robert Moffat, High Legh, Knutsford WA16 6PS
Tel: 01925 755043 Fax: 01925 757377 Email: proaction@rcomp.co.uk


